
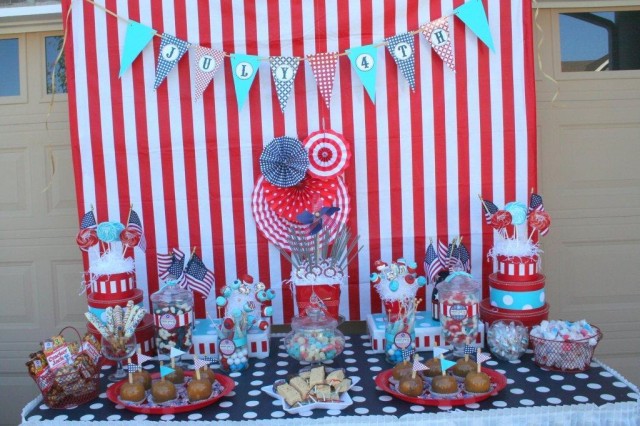
Today's parties & events are all about the little details. Long gone are the days when you could just set out a cake and a balloon bouquet and call it a party. Most guests are looking for that 'wow' factor--that little something extra that distinguishes your party from the neighbor's. One way the 'wow' factor is achieved is with the increasingly popular table backdrop.
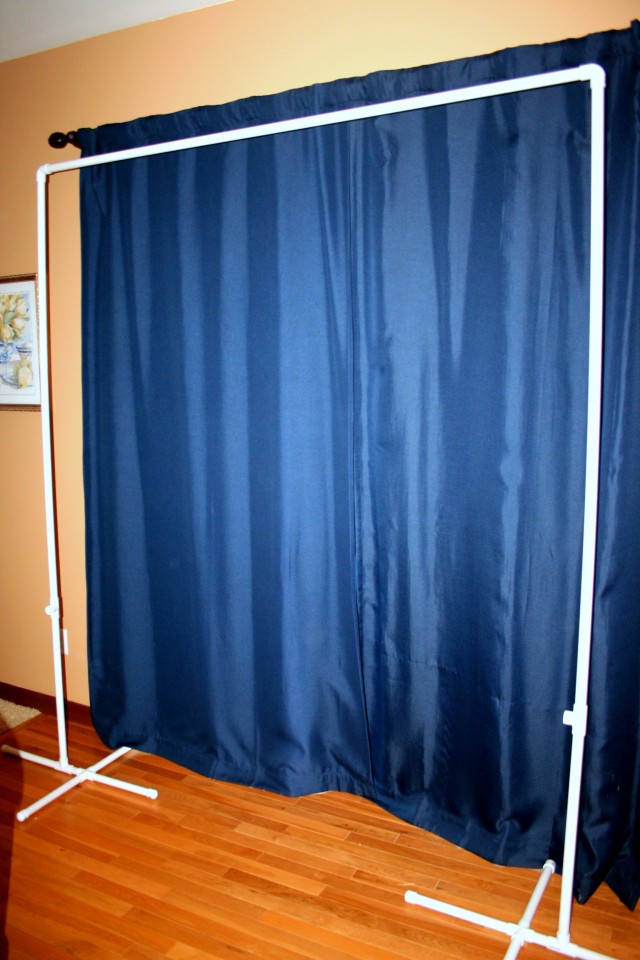
After "How do you plan a party?", the next most frequently asked question I get is, "How did you make your party backdrop?" Today, I'm going to let you in on a little secret. Anyone can do it! (But shhh! Don't tell my husband. He likes everyone to believe that only he can build such party-transforming masterpieces.) What's even better than it's easy assembly? This backdrop stand is fully collapsible, size-adjustable, transportable AND inexpensive! Oh, and best of all? Using very simple and inexpensive materials you will effortlessly transform your lackluster party into something fabulous!
Now let's get started on building your backdrop.
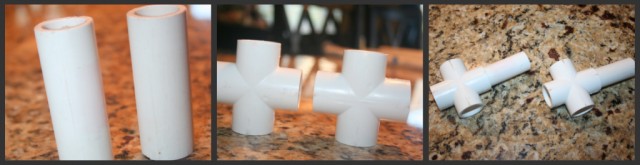
STEP 1: Head to your favorite home improvement store. We chose Home Depot. Pick up the following materials (approx. $20+/-):
- 3/4"x10' Sch. 40 PVC Pipe - 4 (at least)
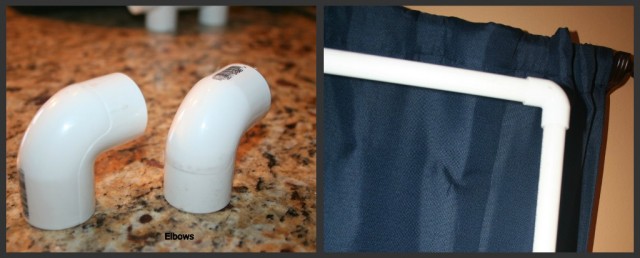
- 3/4" Sch. 40 PVC Elbow - 2
- 3/4" Sch. 40 PVC T-Connector - 2
- 3/4" Sch. 40 PVC Cap - 8
- 3/4" Sch. 40 PVC Cross Connector - 2
STEP 2: Using a PVC pipe cutter, mitre saw or hacksaw, take your 3/4" x 10' PVC pipe and cut 8- 1 foot pieces. Place a cap on one end of each.

STEP 3: Next, take your remaining 3/4" pipe and cut 2 pieces of pipe, approx. 2 inches in length, and firmly stick them into one hole on each of the cross connectors (they look like a + sign and have 4 holes for connecting purposes).
STEP 4: Stick the T-connectors on the 2" pieces of pipe, and stick one of your 1 foot cut pipe sections into the other end of the T-connector (the top of the T will be for the vertical sides of the actual background frame).
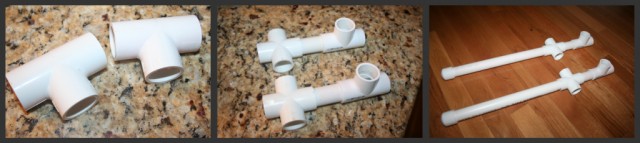
STEP 5: Stick your other 1 ft. pipe sections into the other open holes on the cross connectors, so you have two large "+'s," with a T-connector on the same side of each. You should have 2 bases for your stand.

Now that the base supports are finished, we will work on building the frame.
STEP 6: Cut two of the other unused sections of 3/4" pipe pieces to whatever size you'd like (these will determine the height of your backdrop stand). Make sure the height is low enough to not hit the ceiling if you'll be using the stand indoors, but high enough so the backdrop will provide an adequate background for your dessert or buffet table. (*I cut my pieces to 7 feet. You can always adjust the heighth of your backdrop by using shorter or taller pieces of pipe, based on your needs.)
STEP 7: Next you will be cutting your top 'crossbar'. The length of your 'crossbar' (the top piece of PVC pipe) depends on how wide you want your backdrop to be. Since I wanted it to be as wide as the dessert table I most commonly use, I had my crossbar cut to 6 ft. *The crossbar can easily be traded out for a wider or narrower piece of PVC pipe should you need to adjust the width of your background.
STEP 8: Now, take the two side support pipes you cut in STEP 6 and stick a 90° elbow on one end of each one, then stick the crossbar pipe into the two elbows.
STEP 9: Finally, you are ready to stick the two side support pipes into the tops of the T-connectors on each base, and see how your backdrop stand looks. You may need to slightly adjust and tighten each connection to secure your stand. [caption id="attachment_4721" align="aligncenter" width="640"]
Adding Fabric/Material to Your Background Stand: The great thing about this background stand is that a variety of materials can be used for the background. Add a tablecloth, sheet, fabric, butcher paper, wrapping paper, etc... In the featured picture, I used a striped flannel backed vinyl tablecloth, purchased from Target for $5. Installation was easy! 1- I made sure the tablecloth was as wrinkle free as possible. (I steamed it.) *Be sure you follow instructions for the kind of fabric/material you are using to avoid burning it! 2- I centered the tablecloth on the top of the crossbar so that my overhang on each end was approximately equal, then rolled the top over the crossbar, ever-so-slightly and secured it with straight pins. 3- Then, one side at a time, I pulled the fabric taut on each side and finished by rolling it around the side supports and secured it with straight pins as well.
You are now ready to decorate your backdrop. Many different party supplies can be added to your backdrop for added interest and pizzazz. Consider adding a printable banner and graphics from one of your favorite printable designers to easily tie in your theme. Coordinating images on things like cupcakes & party favor bags help make the background an extension of your tablecloth & tabletop decor. Party poms, fans, parasols, balloons, bunting and streamers are all fun additions too.
Here are a couple of examples:


